Back to Microsoft and Windows

After nearly four years of being in the Apple camp, I’ve got a new laptop with the very latest Windows 10 Pro installed.

First impressions:

    Laptop has Intel i5 processor, SSD and 8GB RAM. Pretty jolly quick!

    Start-up is much faster than my 7 year-old Macbook Air with Intel i3 and 4GB RAM.

    Search is excellent, giving loads of options when the Search box is clicked in.

    Office 365 (or Microsoft 365 as it’s now called) is very fast to start up – 3 seconds or so for Word. That’s as fast as LibreOffice on MX Linux. Not tried any of the other parts yet.

    The new Edge browser is excellent – fast and with some great functions such as vertical tabs.

The main benefit I’ve seen however, is the full integration of Word, Excel etc and OneNote on iOS/Android. Unfortunately there’s no mobile version of LibreOffice, and the ports of OpenOffice just don’t work properly with any cloud storage providers. It’s a real shame that LibreOffice, now being so good, doesn’t look at a mobile version.

My only gripe so far, is that I had to play around with partitions in order to get the Disk Image saving to work. That was a lot of nonsense to add 50Mb to the System Reserved partition in order to allow the Shadow copy to generate properly.

However, having said that, it takes about 20 minutes or less to do a complete disk restore from blank or another OS. Excellent!

How to boot Windows 8.1 into Desktop mode

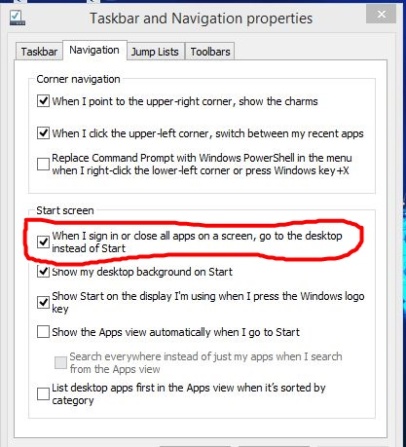
Yes, Windows 8 has a Desktop mode, and from Windows 8.1, you can set your machine to boot directly into it, bypassing the Start Screen.

Firstly you need to go into the Desktop itself.

On the Start Screen type in desktop and click on the tile that appears in the search.

When you’re in the desktop, right-click on the Task bar and select Properties.

Go to the Navigation tab and uncheck the following option:

Image

Next time you boot up, your machine should boot directly into the Desktop.

Create Shutdown, Restart And Other Tiles On The Windows 8 Start Screen

The Start Screen is central to the Windows 8 Modern app experience. Hence it makes sense to have dedicated tiles for triggering shutdown and restart. The current method is rather inefficient in terms of ease of use. These shortcuts will be one-click tiles that will do the work for you.

Creating A Shutdown Tile On The Windows 8 Start Screen

Step 1 — Go to the desktop. Either use WIN+D or click the desktop tile to do this.

Step 2 — Right click on an empty area and choose New>Create Shortcut from the right click menu.

Step 3 — The wizard will appear and ask you for the location. Instead of browsing, copy paste the following

shutdown.exe -s -t 00

Step 4 — Now click next and type in the name. Shutdown is the most appropriate but you can type in anything you want.

Step 5 — Now you will see a shortcut on the desktop with a default icon. This icon is not very indicative of what the shortcut is for. To change this, right click on it and go to properties > change icon. You will get a message that says your shortcut has no icons. Click okay on this and you will be taken to the default set of icons on your system. Choose the power symbol or any other icon on the default collection. Or you can click browse to choose an icon located somewhere else.

Step 6 — Now that your shortcut is complete with an icon, you have to place it in another directory. Hit CRTL+C or right click on it and choose copy. Go to the following directory and paste the shortcut there: –

C:\ProgramData\Microsoft\Windows\Start Menu\Programs

Either paste this in your address bar or navigate to it from C: — if you can’t see the “ProgramData” directory, turn on “hidden items” for your system. ProgramData is a hidden folder.

Since the directory is a system folder, you might be prompted with a dialog box that asks for administrative privileges. Click on ‘continue’ to finish the process.

Step 7 — If you have followed all the steps correctly, you can now go back to the Start Screen and marvel at your newly created ‘Shutdown’ tile, complete with the icon you chose. If you don’t see the Shutdown tile for some reason, you can search for it by name and then pin it on your Start Screen. You get to the search option from the Start Menu or by starting to type when you are on the start screen. Once you find the Shortcut, right clicking on it will bring up the option to pin it.

Adding Tiles For Restart, Lock Workstation, Hibernate And Sleep To the Windows 8 Start Screen

You can create other shortcut tiles by following the same basic steps and only altering the code that you use for the shortcut. Here are the codes for Sleep, hibernate and others: –

Restart Computer: shutdown.exe -r -t 00

Lock Workstation: rundll32.exe user32.dll,LockWorkStation

Hibernate Computer: rundll32.exe powrProf.dll,SetSuspendState

Sleep Computer: rundll32.exe powrprof.dll,SetSuspendState 0,1,0

For the ‘hibernate’ and ‘sleep’ options, you will have to make sure that your hardware supports these options. The rundll32.exe has its own icon but you might want to change it.

nserted from <http://windows7themes.net/add-shutdown-and-restart-tiles-to-your-windows-8-start-screen.html>

How to create a Custom Refresh Image in Windows 8.1

It is recommended, after installing Windows 8 and all of your other Apps, that you create a Custom Refresh Image. When you do this, the Custom Refresh Image will be used whenever you refresh the computer and you will not lose all of the software programs/apps that you have manually installed. 

To create a Custom Refresh Image, perform the following steps. 

Important: Exit all running programs. If you are using a portable computer, plug in the AC Adapter while you create the image. 

1. Press the WinKey+X to display the system menu and select the Command Prompt (Admin).

2. In the command window, type the following command.

recimg.exe /createimage C:\RecoveryImage 

Press Enter.


(Note the 2 spaces in the command)


The creation process will show 4 steps.

Initializing – 100% 

Creating Snapshot – 100%  

Writing Image – 100% 

Registering Image – 100% 

Note: The Writing step will not start immediately and will take approximately 30 – 45 minutes to complete, the other 3 steps are very quick.

After the command completes, open Windows Explorer and navigate to the C:\RecoveryImage folder. You should see a file named CustomRefresh.wim.

It’s recommended that you create a custom refresh image occasionally to update any changes you have made to the computer.

Source:

Refresh and Reset your PC – Building Windows 8:

http://blogs.msdn.com/b/b8/archive/2012/01/04/refresh-and-reset-your-pc.aspx

Office 365 Home Premium – new install!

So now I’ve taken the plunge and subscribed to Microsoft Office 365 – the principal reason being that Outlook 2013 will sync email AND contacts AND tasks with an outlook.com mail account natively with no third-party add-ins required.

The only downside that I’ve seen so far is that Outlook.com contacts don’t support groups or distribution lists but that’s not too much of a problem as I can create those locally in my pst file.

The other advantage to Outlook 2013 is that they seem to have sorted out the desktop notifications for IMAP mail accounts, which as my other account is an IMAP Gmail account is very handy!

There are a lot of reported problems with the downloading and installation of Office 365 (whether Home Premium or University) but thankfully I don’t seem to have encountered any of them.

The main error seems to be “sorry something has gone wrong”.

There is an MS knowledge base article for this one:

Something went wrong” error when you install Office 2013 or Office 365

http://support.microsoft.com/kb/2827031/en-gb

which contains a variety of fixes for this error.


There is also a general troubleshooting page for installation problems:

General Troubleshooting for installing

http://support.microsoft.com/kb/2822317/en-gb


These two pages should solve most common problems with downloading and installing.

For further help on this go to this site:

http://answers.microsoft.com/en-us/office/forum/office_365hp?tab=QnA


Hotmail (Outlook.com) or Gmail?

As I have a Windows 8 laptop, a Kindle Fire HD and a Galaxy Mini phone, I originally went the Gmail way which allowed me to view emails, calendar, tasks and contacts on all three devices. The only downside was that I had to purchase a small utility in order to allow Outlook 2010 to sync with Gmail tasks. I also was under the impression that the only apps that could do this with Hotmail on the two android devices was a commercially available app called Touchdown for Exchange.

However, with the advent of Office 365 (and the monthly subscription model) I discovered that Outlook 2013 would in fact sync Hotmail tasks with no add-ins needed, and that there are actually free apps on Android that will do the same on both my Kindle and phone.

Office 365 also allows installation on 5 Android devices as well as 5 computers, so that also means I can use Mobile Office 365 apps on my Kindle and phone.

The apps I use on my Kindle and phone are:

For email the Outlook.com app, which also syncs Contacts and Calendar:

For Tasks, the free app called Tasks and Notes for Exchange

This has also meant that I’ve been able to rationalise my email accounts!


Things you must know about Windows 8 Refresh

The most important statement in that message is the fourth one down:

Apps you installed from discs or websites will be removed.”

This means that ANYTHING you have installed that was NOT installed from the Windows Store WILL BE REMOVED.

You MUST ensure that you have all the installation media and product keys (if applicable) BEFORE you click “next” – not after!

You should also take a backup of all your critical data as well.

If you do this then there should be no problems afterwards!

Windows 8 – Confused by the new GUI?

Don’t panic! Windows 8 has two modes – the modern GUI, and Desktop mode that looks and behaves just like Windows 7?

On your Start screen, click the Desktop tile to go into the Desktop.

You can tell your computer to boot into the Desktop mode by default (and reinstate the Start button as well) by using one of these utilities:

How to regain the start menu in Windows 8:

Free:

http://www.iobit.com/iobitstartmenu8.php

http://classicshell.sourceforge.net/

Small cost – currently US$5

http://www.stardock.com/products/start8/

I use the Stardock product and you can’t tell from looking at my computer that I am not running Windows 7…

Here’s what it looks like: